ConsignPro Guided Tour - Main Menu

Welcome to our Guided Tour!
The ConsignPro Main Menu is the starting point for everything you do in ConsignPro - making it simple to use even for the "technically challenged" to learn and use our software.
Every transaction starts and ends at the Main Menu. Each menu button also has a function key associated with it so you don't even need to use the mouse (ex. F1, F2, etc).
The menu is available in five color schemes, easily changed by clicking the color buttons in the top right corner. We also have menu "skins" available for every segement (men's, women's, children, furniture, vintage, etc).
From the Main Menu, we'll click "Add Consignor" or press F2 to see how easy it is to add a new consignor to the system.
ConsignPro Guided Tour - Add Consignor screen

The "Add Consignor" screen automatically assigned consignor id #27 to this consignor, using the Tab key to move around, we added the consignor information. Bold fields are required, others are optional.
When done adding the consignor information, we can print a consignor contract, add items to the account, add another consignor (Save), or simply return to the Main Menu.
From here, we'll click "Add Items" (lower right) to see how easy it is to add consigned items to this consignors account.
ConsignPro Guided Tour - Add Inventory screen

The "Add Inventory" screen automatically assigned Item #35 to this item and filled in many of the screen fields for us automatically.
Again using the Tab key to move around the screen, we completed the remaining BOLD fields: Type, Description, Color, Size, and Price.
The drop-down inventory lists are created by you when you setup ConsignPro. You can also type your entries into each box.
When done, you can "Add Another" item for this consignment, print a bar-coded tag, or finish and return to the Main Menu.
From here we'll return to the Menu and click "Make Sale" to sell item #35.
ConsignPro Guided Tour - Make Sale screen

To sell an item, simply enter item number or scan the barcode from the ConsignPro tag. Each page holds 8 items and we allow for 10 pages (or 80 items) per sale.
We sold our item 35 and a bunch of other items. We also discounted that item by 10%. Item prices can be changed right here and you can also selectively tax each item. Two items on our sale are taxed.
If the sale is interrupted, you can save the sale and return to it later. When done, you would click "Finish Sale" (or press Alt+F on your keyboard).
From here we'll click "Finish Sale" to complete the sale.
ConsignPro Guided Tour - Amount Due screen
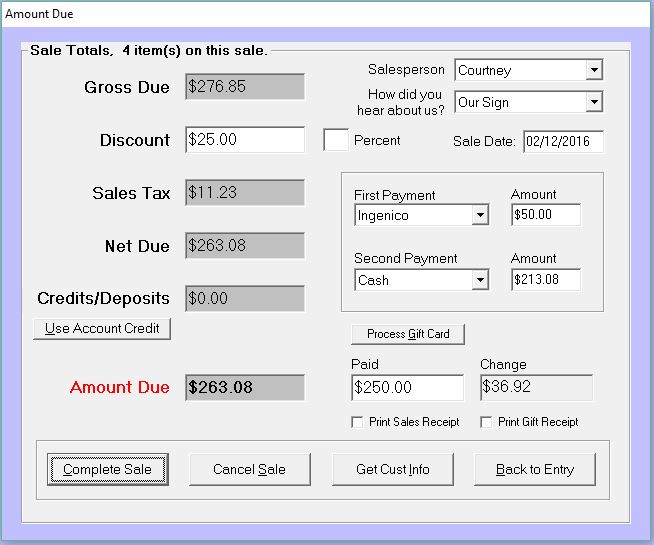
The Amount Due screen totals the sale, calculates state sales tax, and records the payment type (in this case two).
In this example, we applied an additional $25 discount. The customer asked to pay $50 on her credit card, the remainder by cash. We used the Paid & Change boxes to know how much change to return to the customer.
ConsignPro has built-in credit card processing and can use your Internet connection to process the charge. You can also sell a Gift Card (or redeem one) right from this screen using the “Process Gift Card” button – no outside service is necessary!
If your customer is also a consignor, you can click "Use Account Credit" to pay for all or part of their purchase.
You can "Get Cust Info" to collect customer name, address, phone, and e-mail address. ConsignPro tracks customer visits, purchases, and amounts spent for reporting or marketing purposes. We recorded how the customer heard about us (Local Newspaper) so that we know how well our marketing efforts are doing.
From here we'll click "Complete Sale" to print a detailed sales receipt and complete the sale.
ConsignPro Guided Tour - Find Consignor screen
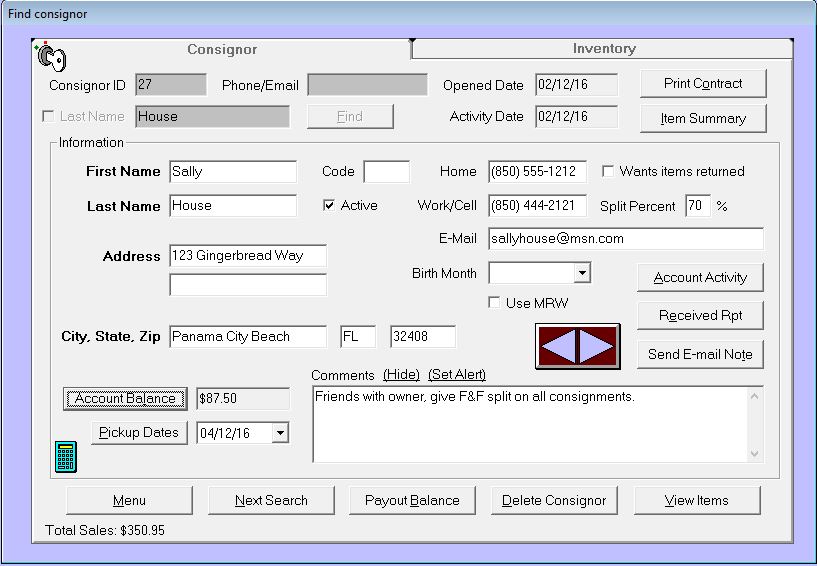
After completing the sale, we wanted to see how the consignor was paid so we went to "Find Consignor" and looked up Ms. House (by ID #, or Phone #, First Name, or Last Name).
This “Find Consignor” screen layout is the same as "Add Consignor" but gives us many more options. We notice this consignor now has a $87.50 account balance.
On this screen, we can click "Payout Balance" to pay the consignor, send the consignor an e-mail note, or view her "Account Activity". Note that the total of all her sales ($350.95) appears in the lower right corner – you’ll know at a glance who your best consignors are!
We'll click "Account Activity" to see the detail behind the consignor account balance.
ConsignPro Guided Tour - Account Activity screen
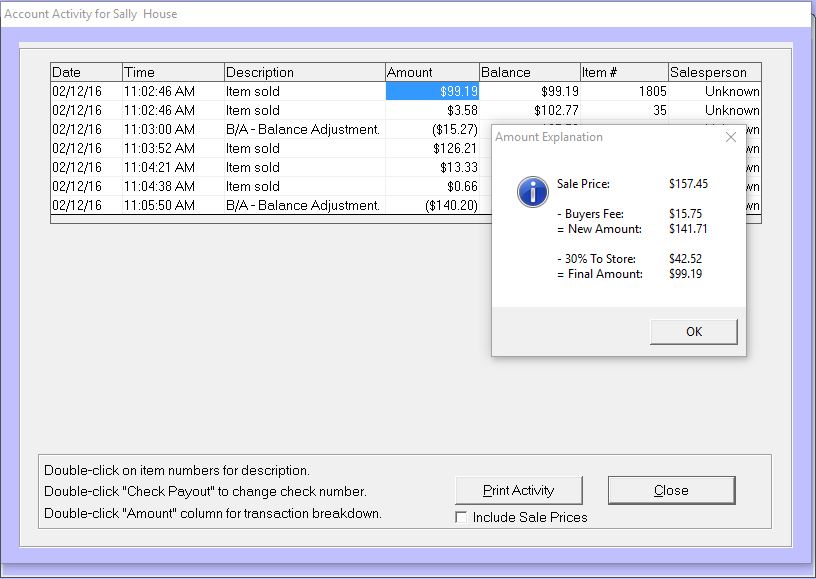
The Account Activity screen shows all activity on this account. In this case, we see several items that have been sold and a few balance adjustments. We'll take a closer look at item 1805 that we just sold.
We see the date and time of the sale, amount paid to the consignor and the item number. We double- clicked on $99.19 to see a more detailed breakdown of how ConsignPro calculated the amount.
"Print Activity" will print a detailed report of all (or a subset) of the consignor account activity.
ConsignPro Guided Tour - Maintain Store screen
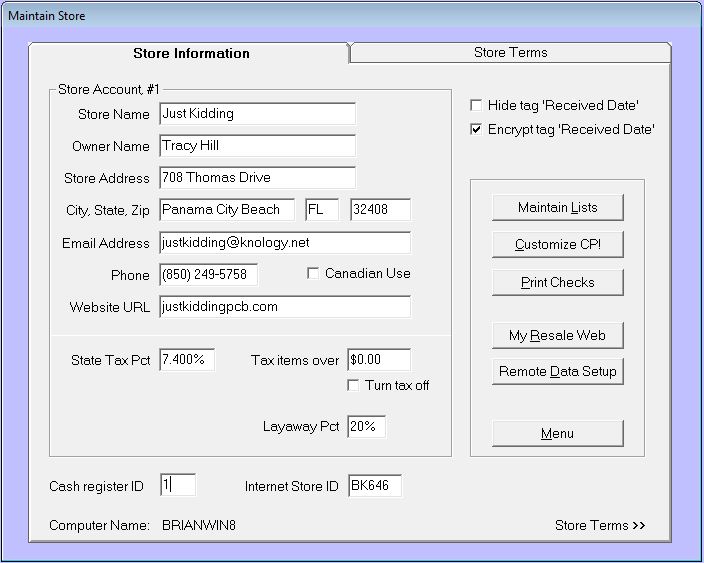
From the Main Menu, our Maintain Store screen allows you to setup your store defaults, system lists, printers and other POS hardware, and print consignor checks.
Only the store owner has access to this screen - we'll look at setting up system access on the Employees screen later.
Maintain Store has two "tabs", we'll investigate the "Store Terms" tab next.
ConsignPro Guided Tour - Store Terms screen
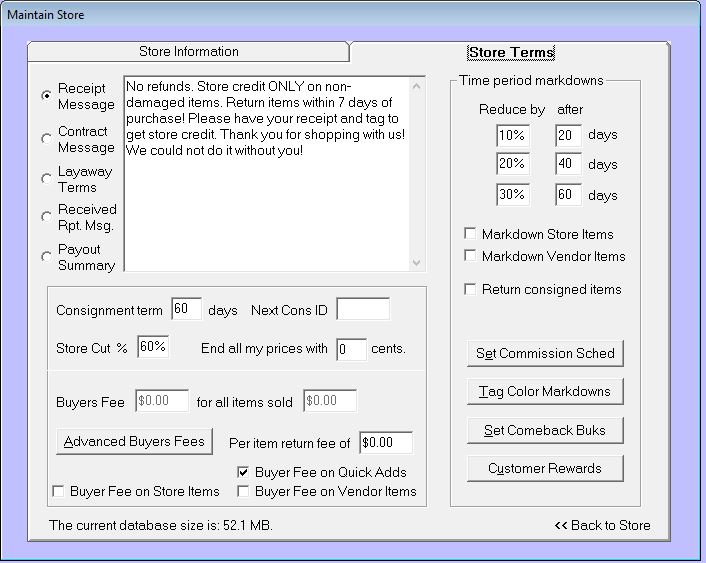
The Store Terms tab gives us a place to setup customized messages that appear on receipts and statements, markdown schedules, commission rates, buyers fees, Comeback Buks (a coupon that can print on customer sales receipts), special commission schedules, and your customer rewards (loyalty) program.
While these options are set here, most can be customized on individual consignors or items as they are added to the system. You can change these options at any time too.
Again, only the store owner has access to this screen. Next we'll look at the Employees screen where you setup access to the different screens and features in ConsignPro.
ConsignPro Guided Tour - Employees screen
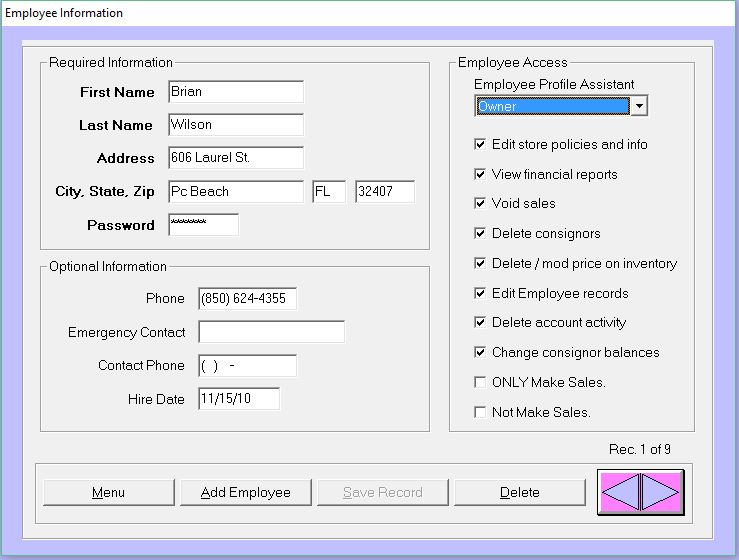
The Employees screen is used to setup each store employee. Besides basic information, you can assign an employee password and setup the screens and features that employees have access to (right side).
Employees sign in and out of ConsignPro using the "Sign On" screen (F7 on the Main Menu). ConsignPro can be setup to "timeout" and return to the Sign On screen after the number of minutes you specify.
This ensures almost complete system security. The system also tracks "suspect" activity on a "system log file" that only the store owner has access to!
ConsignPro Guided Tour - Reports screen
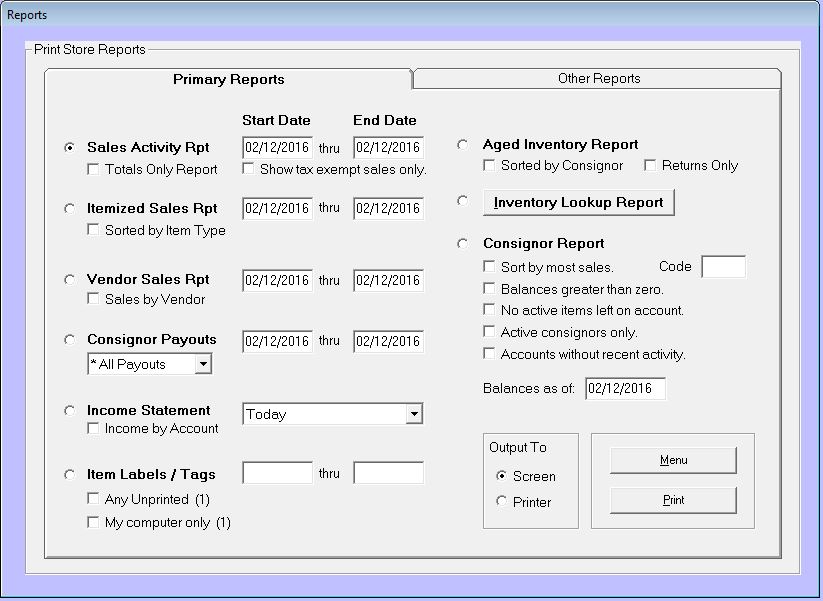
Finally we'll look at the Reports screen (F9 from the Main Menu).
The Reports screen has tabs for "Primary Reports" and "Other Reports". In total there are over 25 reports in the system showing sales, payouts, inventory, consignors, and customers. Most reports can be sorted and summarized in several different ways.
Mailing labels and inventory tags (or labels) can also be printed from this screen.
Reports and tickets can be printed either to the screen or to your InkJet or LaserJet printer with just a few quick clicks.
ConsignPro, The industries favorite software!
Thank You for taking our Guided Tour.
In this presentation we briefly touched on 11 of the 70+ screens in the ConsignPro system. You probably noticed how well our screens are designed and how easy the system is to use. ConsignPro has hundreds of features inspired by the combined experience of 6,000+ resale shop owners and we improve the software monthly.
....And now for our Special Offer !
Visit our secured Order Page and enter “tour" into the “Discount Code” box on our Order Page we'll automatically take $100 off your order!! All purchases come with an unconditional 30-day moneyback guarantee, so, what are you waiting for?
It has been my pleasure to take you on this tour.
Sincerely,

ConsignPro Creator

 Guided Tour